
Worm Composting on a Balcony: A Simple, Clean Way to Turn Scraps into Nutrient-Rich Soil
If you’re serious about balcony composting and want something clean, efficient, and surprisingly low-maintenance, worm composting is where things get exciting. I remember when I first set up my worm bin—I expected it to be messy or complicated. Instead, it turned out to be one of the easiest and most rewarding parts of my balcony garden.
Vermicomposting uses worms to break down kitchen scraps into nutrient-rich compost called worm castings. It’s perfect for small spaces because it’s compact, fast, and—when done right—completely odor-free.
If you’re new to composting in general, I recommend starting here:
👉 Balcony Composting 101: Turn Scraps into Black Gold in Small Spaces
Table of Contents
What Is Worm Composting (Vermicomposting)?
Worm composting, also known as vermicomposting, is a process where special composting worms break down organic waste into rich, fertile compost. The worms consume food scraps and convert them into castings, which are packed with nutrients and beneficial microbes.
What makes vermicomposting ideal for balconies is its simplicity. You don’t need a large space, constant turning, or complicated systems. Once your bin is set up, the worms do most of the work for you.
From experience, it feels less like “managing compost” and more like maintaining a small ecosystem.
If you want to go deeper into the process, this complete guide on worm farming breaks down everything you need to know—from setup to harvesting rich worm castings.
Why Worm Composting Is Perfect for Balconies
One of the biggest advantages of worm composting is how well it fits into small, urban spaces. Unlike traditional compost bins, worm bins are enclosed, compact, and easy to manage indoors or outdoors.
In my own setup, I keep my worm bin tucked under a shaded corner of my balcony. It doesn’t take up much space, and there’s no smell—as long as I follow basic rules.
Worm composting is also faster than many other methods. Within a couple of months, you start seeing rich, dark compost forming, ready to feed your plants.
What You Need to Start a Worm Bin
Getting started with vermicomposting doesn’t require expensive equipment. In fact, you can build a simple system with just a few basic items.
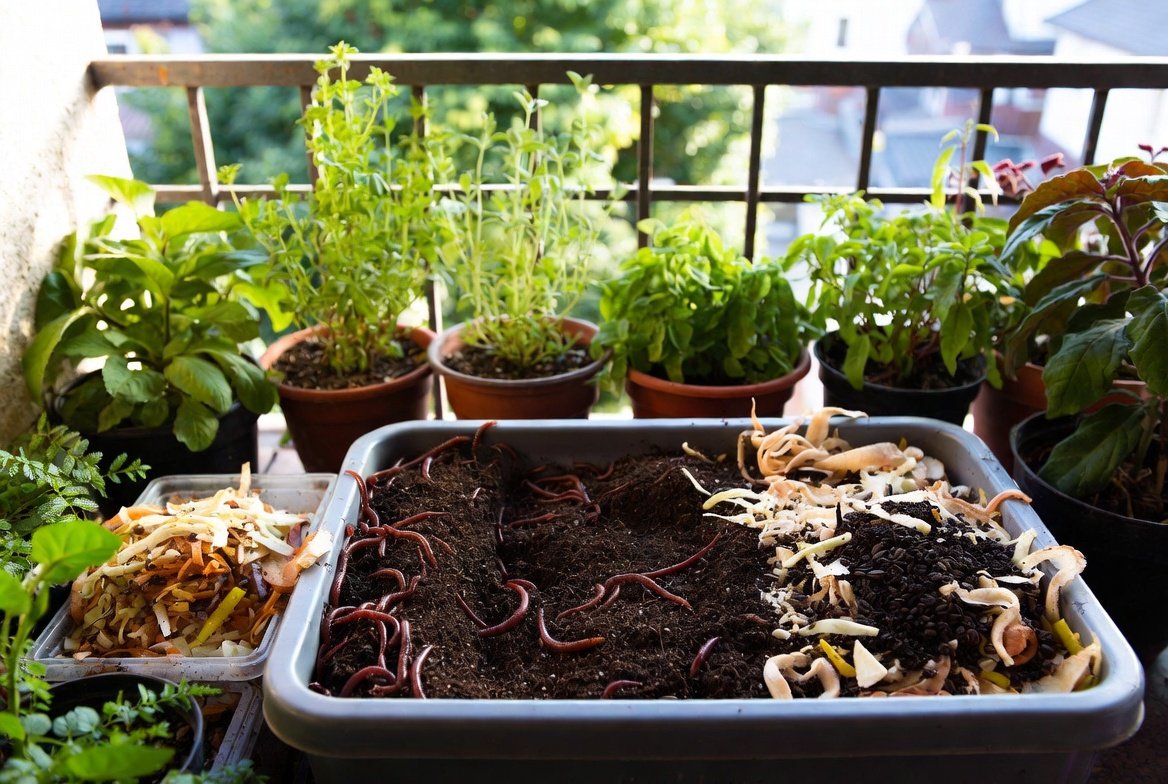
You’ll need a container with a lid, bedding material like shredded paper or coconut coir, food scraps, and composting worms (usually red wigglers). The bin should have small air holes for ventilation and a way to manage excess moisture.
When I started, I used a simple plastic container with drilled holes, and it worked perfectly. The key isn’t fancy equipment—it’s understanding how to maintain the system.
Choosing the Right Worms
Not all worms are suitable for composting. The best choice is red wigglers (Eisenia fetida), which thrive in organic waste and reproduce quickly.
Avoid using garden earthworms—they don’t adapt well to compost bins and won’t break down waste efficiently.
I got my first batch of worms from a local supplier, and within weeks, they multiplied and became self-sustaining. Once your bin is healthy, you won’t need to replace them.
Step-by-Step: How to Set Up a Worm Bin on Your Balcony
Setting up your worm bin is straightforward when broken down into simple steps.
Start by preparing your bin with moist bedding. It should feel like a wrung-out sponge—damp but not dripping. Add your worms and let them settle for a day before feeding.
When you begin feeding, add small amounts of kitchen scraps and bury them under the bedding. This helps prevent odors and keeps the bin clean. Over time, you’ll notice the scraps disappearing and being replaced with dark, crumbly compost.
In my experience, patience is key during the first couple of weeks. Once the worms settle in, everything becomes much easier.
What to Feed Your Worms (And What to Avoid)
Feeding your worms correctly is one of the most important parts of vermicomposting. They thrive on fruit and vegetable scraps, coffee grounds, and small amounts of paper.
However, not everything belongs in a worm bin. Avoid meat, dairy, oily foods, and excessive citrus, as these can harm the worms or cause odor problems.
If you’re unsure about specific materials, check this detailed guide:
👉 What Can You Compost on a Balcony? (Complete Do’s and Don’ts List)
From my routine, I feed my worms two to three times a week in small amounts. Overfeeding is a common mistake—less is often better.
How to Keep Your Worm Bin Odor-Free
One of the biggest concerns beginners have is smell—but a properly managed worm bin should not stink at all. If it does, something is out of balance.
The most common causes are overfeeding, too much moisture, or poor airflow. I’ve had moments where I added too many scraps at once, and the bin started smelling slightly sour.
The fix is always simple: add more bedding, reduce feeding, and gently aerate the bin.
For a deeper breakdown of odor issues and quick fixes, see:
👉 Why Your Balcony Compost Smells (And How to Fix It Fast)
Maintaining Your Worm Bin (Simple Weekly Routine)
Keeping your worm bin healthy doesn’t require daily effort. A simple weekly check is enough to keep everything running smoothly.
I usually check moisture levels, add bedding if needed, and ensure the worms are actively breaking down food. If the bin feels too wet, I add dry paper. If it’s too dry, I lightly mist it with water.
This routine takes less than 10 minutes and prevents almost every common problem.
Harvesting Worm Castings
After about 2–3 months, your bin will start producing finished compost—dark, crumbly, and rich in nutrients. This is what your plants will love.
To harvest, you can move finished compost to one side of the bin and add fresh bedding and food to the other side. The worms will naturally migrate, making it easy to collect the compost.
The first time I used worm castings on my balcony herbs, the difference in growth was noticeable within weeks. It’s easily one of the best natural fertilizers you can produce at home.
Using Worm Compost for Balcony Plants
Worm castings are incredibly versatile and gentle on plants. You can mix them into potting soil, sprinkle them on top of containers, or even make a liquid fertilizer (often called worm tea).
On my balcony, I usually mix castings into soil at a 1:3 ratio. This improves soil structure, boosts nutrients, and helps plants grow stronger and healthier.
It’s one of the simplest ways to upgrade your balcony garden naturally.
Final Thoughts
Worm composting is one of the easiest and most efficient ways to recycle kitchen waste on a balcony. It’s clean, compact, and produces some of the best organic fertilizer you can give your plants.
Once you understand the basics—feeding properly, maintaining moisture, and avoiding common mistakes—it becomes a low-effort system that runs almost on autopilot.
If you’re building your full balcony composting system, don’t forget to read:
👉 Balcony Composting 101: Turn Scraps into Black Gold in Small Spaces
And for material guidelines and troubleshooting:
👉 What Can You Compost on a Balcony? (Complete Do’s and Don’ts List)
👉 Why Your Balcony Compost Smells (And How to Fix It Fast)
Frequently Asked Questions (FAQs)
1. Do worm bins smell on a balcony?
No, a well-maintained worm bin should smell earthy, not foul. Bad odors usually mean overfeeding or excess moisture.
2. How many worms do I need to start?
About 1 pound of worms is enough for a small household composting system.
3. Can worm bins survive hot weather?
Worms prefer moderate temperatures. In hot climates, keep the bin shaded and cool to avoid stressing them.
4. How often should I feed my worms?
Feeding 2–3 times per week in small amounts is ideal. Avoid overloading the bin.
5. Can I keep a worm bin indoors?
Yes, worm bins can be kept indoors as long as they are properly maintained and odor-free.
6. What happens if I overfeed my worms?
Excess food can rot before worms process it, leading to odor and imbalance. Reduce feeding and add more bedding.
7. How long does it take to get compost from worms?
Typically, you’ll start seeing usable worm castings within 2–3 months.
Further Reading
If you’d like to explore worm composting in more detail, these expert resources offer practical tips, deeper insights, and proven methods to help you get the best results.
👉 How to Worm Farm on a Balcony — This guide shares practical DIY methods for creating in-container worm farms that integrate directly into balcony planters, allowing worms to move freely and naturally enrich the soil.
👉 Composting with Worms (Oregon State Extension) — This resource explains how vermicomposting uses red wiggler worms to convert food waste into nutrient-rich compost efficiently in small spaces with minimal effort.
👉 Worm Composting Guide (RHS) — This guide covers how worm bins work, ideal conditions for worms, and how to maintain a healthy system to produce both compost and liquid fertilizer year-round.