

Urban balconies can feel limiting when spring arrives and the urge to plant kicks in. Cool nights, sudden wind gusts, and inconsistent sunlight often slow down container seedlings before they’ve had a real chance to establish. A well-designed balcony mini greenhouse changes that dynamic. It creates a buffered microclimate where fragile herbs and container seedlings can thrive weeks earlier than they normally would.
In modern remote work culture, balconies have become extensions of living and working spaces. Between Zoom calls and focused work blocks, tending to seedlings offers a reset from screens. A DIY urban greenhouse makes that rhythm more sustainable. It protects basil, mint, parsley, tomatoes, and leafy greens during temperature swings, while keeping the setup compact and neighbor-friendly.
This guide walks through why a balcony greenhouse is worth the space, the materials needed, ventilation strategies, and a practical step-by-step build process. The goal is not a heavy permanent structure, but a lightweight, adaptable solution that fits real apartment life.
Table of Contents
Why a Balcony Greenhouse Is Worth the Space
A balcony mini greenhouse isn’t about aesthetics alone. It’s about extending your growing season, protecting plant investments, and stabilizing fragile growth stages in unpredictable weather.
When growing container seedlings in early spring, nighttime temperatures often drop below what tender herbs prefer. Even in mild climates, concrete balconies retain cold overnight. A small enclosed structure helps trap daytime warmth and shields plants from wind stress. In practice, this means fewer leggy seedlings and stronger stems.
Another key benefit is moisture control. Windy balconies dry out pots quickly. Seedlings in small containers are especially vulnerable because their root systems are shallow. A DIY urban greenhouse slows evaporation, helping maintain consistent soil moisture. That stability significantly improves germination rates and early growth.
From a practical standpoint, the footprint can be modest. Many setups fit neatly along a railing or against a wall. Instead of scattering trays across the balcony floor, you consolidate growth into a single protected zone. For remote workers who step outside during short breaks, having one dedicated growing area also makes plant care faster and more intentional.
Microclimate Control for Container Seedlings
Container seedlings behave differently from in-ground plants. Their root zones heat and cool faster, and they dry out more quickly. A balcony greenhouse moderates those extremes.
During sunny mornings, internal temperatures can rise 5–10°C higher than ambient air, depending on material. That warmth accelerates germination for crops like spinach and cilantro. At night, even a simple plastic covering reduces heat loss enough to prevent shock.
The key is balance. Without ventilation, heat can build up rapidly by midday. That’s why thoughtful airflow design is part of every successful DIY build.
Protection from Wind and Urban Stressors
Balconies experience crosswinds that ground gardens rarely face. Lightweight herbs such as dill and coriander often bend or break in strong gusts. A greenhouse enclosure acts as a windbreak.
Urban air can also carry dust and pollutants. While a mini greenhouse doesn’t filter air entirely, it reduces direct particle contact with tender leaves. For edible herbs grown in containers, that added layer of protection is valuable.
DIY Materials, Setup, and Ventilation Tips
Building a DIY urban greenhouse does not require advanced carpentry skills. The most effective designs are lightweight, modular, and easy to disassemble at the end of the season.
Before gathering materials, assess three things:
- Balcony size and weight limits
- Sun exposure patterns (morning vs afternoon sun)
- Wind direction and intensity
These observations shape the structure’s orientation and ventilation needs.
Basic Materials for a Balcony Mini Greenhouse
A functional setup typically includes:
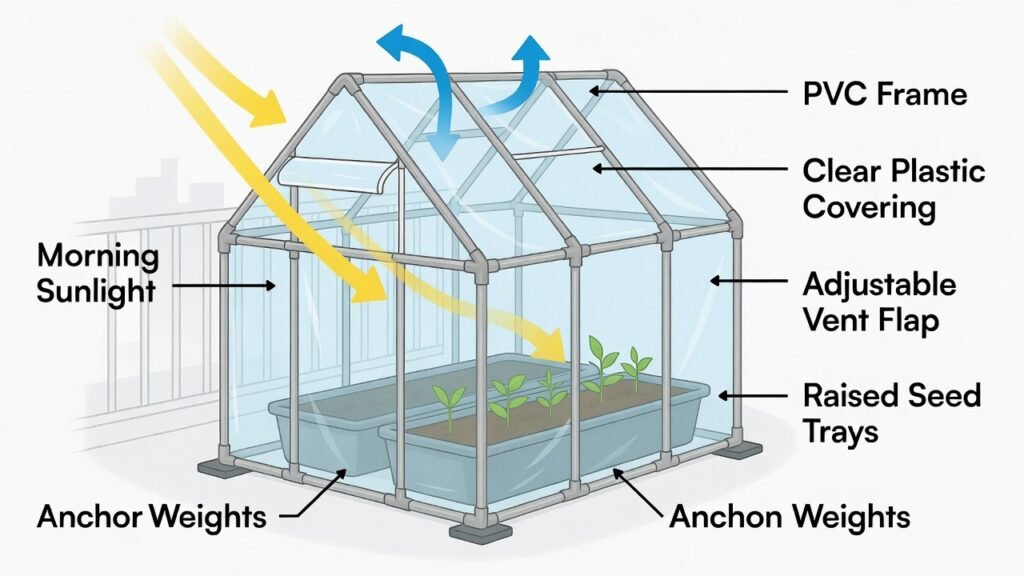
- Lightweight wooden slats or PVC pipes for framing
- Clear UV-resistant plastic sheeting or greenhouse film
- Zip ties or cable ties
- Small hinges (for lift-up lids)
- Velcro strips or clips for ventilation flaps
- Waterproof tape
- Bricks or heavy pots for anchoring
For renters, PVC frames are often preferable because they are lighter and require no drilling into walls or railings.
Ventilation and Light: Getting the Balance Right
A greenhouse that traps heat without airflow quickly becomes a stress chamber for plants. Ventilation must be intentional.
Design tips:
- Include at least one top vent to release rising hot air.
- Add a side flap that can be rolled up during warm afternoons.
- Use clear material with high light transmission but avoid overly thick plastic that blocks sunlight.
- Position the structure where it gets strong morning light and partial afternoon shade if possible.
From experience, the most common mistake is sealing the greenhouse too tightly during sunny days. A quick habit to build is checking internal temperature around midday. If it feels warm to your hand, seedlings may already be stressed.
Step-by-Step Guide: Building a Small Balcony Greenhouse Box
This guide outlines a compact box-style greenhouse that fits over grouped containers or seed trays. It’s designed for herbs and early vegetable starts.
Step 1: Measure and Plan the Footprint
Before cutting materials, measure the area where the greenhouse will sit. Allow extra clearance around pots to avoid leaves touching the plastic. Direct contact can cause condensation-related fungal issues.
A common beginner size is 90 cm wide, 45 cm deep, and 60 cm tall. Adjust based on your container seedlings and available space.
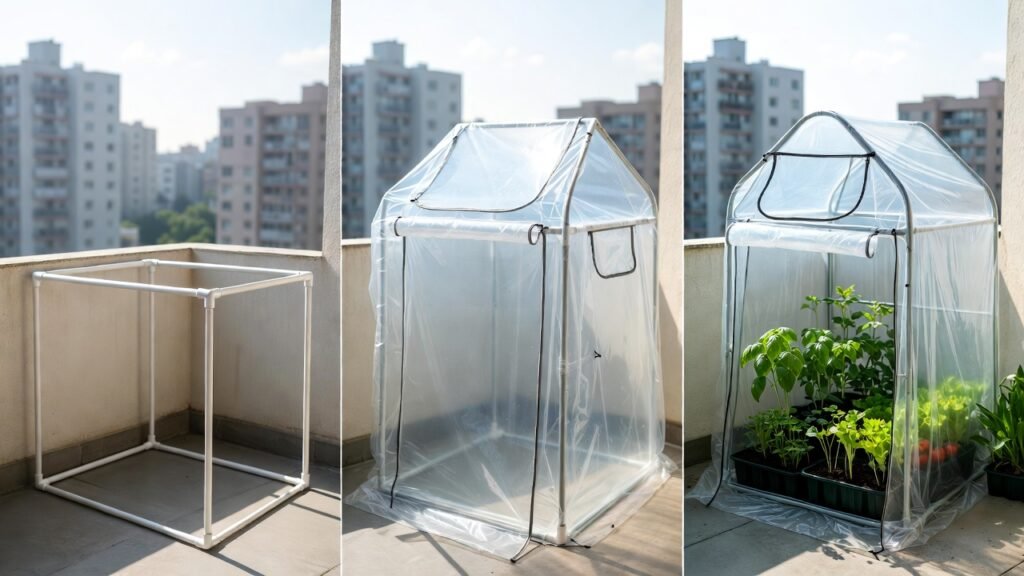
Step 2: Build the Frame
If using PVC:
- Cut pipes to your desired length for base, vertical supports, and top frame.
- Connect using elbow and T-joints to form a rectangular box.
- Ensure the frame feels stable before moving on.
If using wood:
- Create a simple rectangular base and top frame.
- Attach vertical supports at each corner.
- Keep it lightweight; avoid thick lumber.
The frame should be sturdy but easy to lift if needed. Remember, balconies often require flexibility.
Step 3: Attach the Clear Covering
Lay the plastic sheeting over the frame and secure it with zip ties or heavy-duty clips. Pull it taut but not overly tight to avoid tearing.
Leave one side partially unattached to serve as a door flap. This becomes your main access point for watering and inspection.
Seal edges with waterproof tape where wind could slip underneath. Anchor the base with bricks or heavy containers to prevent shifting during strong gusts.
Step 4: Create Ventilation Openings
Cut small rectangular openings near the top on opposite sides. Reinforce edges with tape to prevent tearing.
Attach Velcro strips so the flaps can be opened and closed easily. On warm days, keep them partially open. During cold nights, close them fully.
This flexibility is what separates a simple plastic cover from a truly functional balcony mini greenhouse.
Step 5: Position and Arrange Container Seedlings
Group seedlings with similar light and moisture needs together. Taller plants should not shade smaller ones excessively.
Place trays slightly elevated using bricks or wooden slats. This improves airflow beneath containers and reduces mold risk.
Water carefully. Because evaporation slows inside the greenhouse, overwatering becomes more likely. Check soil moisture with a finger test rather than relying on surface appearance.
Lightweight Cover Option for Individual Pots
Not every balcony needs a full box structure. For small-scale herb growers, individual pot covers can work just as well.
These mini domes can be made using:
- Cut plastic bottles inverted over seedlings
- Clear storage bins turned upside down
- Transparent food containers with ventilation holes
The principle remains the same: warmth retention plus controlled airflow.
For example, basil seedlings often struggle in cool drafts. A simple clear dome during the first few weeks can dramatically improve early growth. Once plants are established, covers can be removed gradually to harden them off.
Practical Tips from Real Balcony Growing Cycles
Modern balcony life often means juggling work calls, deliveries, and limited storage. So greenhouse designs should be easy to fold, move, or disassemble.
Based on real urban growing cycles:
- Avoid permanent heavy glass structures unless space is dedicated solely to gardening.
- Check fastenings weekly. Wind vibrations loosen zip ties over time.
- Clean condensation buildup every few days to reduce fungal risk.
- Rotate containers occasionally to prevent uneven growth from directional light.
Container seedlings respond quickly to improved conditions. Within one to two weeks inside a properly ventilated DIY urban greenhouse, stem thickness and leaf color often improve noticeably.
Balcony gardening isn’t about perfection. It’s about creating small systems that support consistent growth despite urban constraints. A thoughtfully built balcony mini greenhouse becomes one of those systems, extending seasons and protecting fragile herbs when they need it most.
Temperature Control and Watering Inside a Balcony Mini Greenhouse
Once the structure is built, daily management becomes the real skill. A balcony mini greenhouse can swing from cozy to overheated within hours, especially in modern apartment blocks where glass and concrete amplify sunlight.
Temperature control starts with observation. On clear mornings, internal warmth builds quickly. By late morning, it’s wise to open top vents or roll up side flaps. If the greenhouse feels humid and noticeably warmer than the surrounding air, seedlings are likely approaching stress levels. Herbs such as basil tolerate warmth, but lettuce and spinach can bolt under excessive heat.
A simple outdoor thermometer placed inside the greenhouse helps build awareness. Over a few weeks, patterns emerge. Many balcony growers find that early spring requires closed flaps overnight and partial ventilation by midday, while late spring demands near-constant airflow.
Watering inside a DIY urban greenhouse requires restraint. Because evaporation slows, soil remains moist longer than in open air. Overwatering is more common than underwatering in enclosed balcony setups.
Practical watering habits include:
- Checking soil 2–3 cm below the surface before watering
- Using a narrow-spout watering can to avoid splashing leaves
- Watering in the morning to allow excess moisture to evaporate during the day
- Avoiding late evening watering in cool conditions
Condensation on plastic walls is normal, but heavy dripping onto leaves can encourage fungal issues. If droplets accumulate excessively, increase ventilation for several hours.
Best Plants for a Balcony Mini Greenhouse
Not every plant needs greenhouse protection. The goal is to prioritize fragile herbs and container seedlings during early development.
Herbs That Thrive in Protected Balcony Conditions
Some herbs respond exceptionally well to early-season enclosure:
- Basil
- Parsley
- Cilantro
- Dill
- Thyme (especially young starts)
- Chives
Basil, in particular, struggles with cold nights below 10°C. A balcony mini greenhouse helps maintain stable warmth, leading to stronger stems and fuller leaves before transplanting into larger pots.
Parsley and cilantro germinate more consistently when soil warmth is steady. A DIY urban greenhouse reduces the stop-and-start growth that often happens on exposed balconies.
Vegetable Seedlings That Benefit Most
For container seedlings, early protection improves transplant success. Strong candidates include:
- Cherry tomatoes
- Peppers
- Lettuce
- Spinach
- Kale
- Cucumbers (during early growth stage)
Tomatoes and peppers appreciate the added warmth but must be ventilated carefully. Excess heat can cause weak, stretched growth. Lettuce and spinach prefer cooler temperatures, so ventilation becomes even more critical.
Plants That May Not Need Enclosure
Hardier crops such as mature rosemary or established mint often tolerate balcony conditions without greenhouse support. Overprotection can sometimes reduce resilience. Gradual exposure to natural wind strengthens plant structure.
The greenhouse is most valuable during germination and early seedling stages. Once plants develop several true leaves, begin transitioning them to open-air conditions.
Seasonal Timing for Seed Starting and Transplanting
Seasonal rhythm determines how effective a balcony greenhouse will be. Starting too early without enough sunlight can result in leggy growth, even with warmth.
Early Spring Seed Starting
In many temperate regions, seeds can be started 4–6 weeks before the last expected frost. A balcony mini greenhouse makes this earlier start realistic.
Remote workers often find that late winter and early spring align well with seed starting routines. Indoor seed trays can be moved into the balcony greenhouse during the day and brought inside during extreme cold snaps.
Key early-season practices:
- Start herbs and tomatoes indoors first
- Transfer trays to the balcony greenhouse during sunny days
- Close vents at night during cold weeks
Mid-Spring Transition
As night temperatures stabilize above 8–10°C, most container seedlings can remain in the balcony greenhouse full time.
This is the phase for gradual hardening off. Open vents wider each day. Allow plants to experience light breezes. Over 7–10 days, they adapt to natural conditions without shock.
Transplant into larger containers once roots begin circling the bottom of starter cells. Healthy roots appear white and dense.
Late Spring and Summer Adjustments
By late spring, the greenhouse may function more as a wind shield than a heat trap. In warmer climates, plastic covers may need to be removed entirely during peak summer.
At this stage:
- Use the frame with shade cloth instead of full plastic
- Maintain airflow to prevent fungal disease
- Focus on moisture management rather than heat retention
A DIY urban greenhouse evolves with the season. It is not static.
Adapting Your Balcony Greenhouse to Modern Urban Living
Balcony gardening today intersects with remote work, digital fatigue, and compact living. The greenhouse should enhance life, not complicate it.
Keep maintenance simple. Avoid over-engineering. Check plants during natural breaks between tasks. This rhythm reduces burnout and builds consistency.
Storage is another factor. When the main greenhouse season ends, frames should disassemble and fit into a closet or storage box. Plastic coverings can be folded and reused if cleaned and dried properly.
Light reflection from neighboring buildings also matters. Monitor how sunlight shifts across seasons. What works in early spring may create overheating in late May.
Above all, observe plant behavior. Slight leaf curl, pale color, or mold spots signal adjustments are needed. Balcony growing rewards attentiveness more than perfection.
Conclusion
A DIY balcony greenhouse for herbs and seedlings is less about construction and more about creating a stable microclimate within urban constraints. When built thoughtfully and ventilated properly, a balcony mini greenhouse extends the growing season, improves germination rates, and protects fragile container seedlings from wind and temperature swings.
In modern apartment living, where space is limited and time is structured around digital work, this small system becomes a practical anchor. It allows early seed starting without the cost or weight of permanent structures. With careful temperature control, mindful watering, and seasonal adaptation, a DIY urban greenhouse transforms a simple balcony into a productive and resilient growing space.
FAQ Section
1. How warm does a balcony mini greenhouse get?
On sunny days, temperatures inside a small balcony greenhouse can rise 5–15°C above outside air, depending on materials and sun exposure. Without ventilation, it can overheat quickly. Regularly opening vents during midday prevents heat stress and keeps container seedlings healthy.
2. Do herbs need a greenhouse on a balcony?
Mature herbs often do not require full enclosure. However, during germination and early seedling stages, a greenhouse provides warmth and wind protection. Tender herbs like basil benefit the most, especially in early spring when nights remain cool.
3. How often should seedlings be watered inside a mini greenhouse?
Watering frequency decreases because evaporation slows. Many growers water every few days instead of daily. Always check soil moisture below the surface before adding water to prevent root rot and fungal issues.
4. Can a DIY urban greenhouse stay up all year?
It can remain in place, but adjustments are necessary. In summer, plastic covers may need removal to prevent overheating. In colder months, the structure is most useful for early seed starting and frost protection.
5. What size greenhouse is best for a small balcony?
Compact designs around 90 cm by 45 cm are usually sufficient for grouped container seedlings. The structure should allow airflow around pots and fit comfortably without overcrowding the balcony walkway.
6. Is ventilation really necessary in a small greenhouse?
Yes. Even small enclosed spaces trap heat quickly. Without vents, seedlings may wilt or develop fungal problems. Adjustable flaps or roll-up sides help regulate airflow and maintain plant health.
Helpful Resources
- University of Massachusetts Amherst – Starting Seeds in Greenhouses: Detailed seed starting practices relevant to greenhouse use. Starting Seeds in Greenhouses – UMass Amherst CAFE Fact Sheet
- UC Agriculture & Natural Resources – Urban Greenhouse Production: Practical resources on greenhouse production and nursery management for urban growers. Nursery/Greenhouse – UC ANR Urban Agriculture Resources
- University of Maryland Extension – Urban Agriculture Guidebook: Broad, authoritative urban agriculture information that supports small-scale greenhouse and container gardening. Urban Agriculture Guidebook – University of Maryland Extension