

Urban gardening has changed dramatically over the past few years. As more of us work remotely and spend extended hours at home, balconies have evolved from overlooked corners into productive green spaces. In that shift, one practice consistently stands out for delivering fast, visible results in container gardens: balcony worm farming.
A well-managed balcony worm farm quietly transforms kitchen scraps into rich castings that dramatically improve container soil structure, water retention, and nutrient availability. For those growing herbs, salad greens, tomatoes, or flowering plants in pots, vermicomposting offers a reliable way to strengthen plant health without synthetic fertilizers. It is compact, odor-controlled when managed properly, and surprisingly well-suited to apartment life.
Unlike traditional compost piles that require outdoor space and time, a thoughtfully designed vermicomposting container works efficiently in small areas. For balcony gardeners seeking consistent balcony soil enrichment, worms offer a practical, sustainable solution that aligns with modern eco-conscious living.
Table of Contents
Why Worms Improve Soil Quality in Small Spaces
In container gardening, soil fatigue happens quickly. Pots limit root expansion, nutrients wash out with frequent watering, and microbial diversity can decline over time. Worms help correct these imbalances in ways that are particularly powerful in small-space gardens.
Worm castings are biologically active. They contain beneficial microbes, plant-available nutrients, and compounds that support root development. For balcony growers who rely on bagged potting mix, adding worm castings can noticeably improve soil vitality within a few weeks.
How Worm Castings Transform Container Soil
Container plants depend entirely on the soil ecosystem we provide. Worms enhance that ecosystem in several measurable ways:
• Improve soil structure by creating fine, crumbly castings that increase aeration
• Increase water retention without causing compaction
• Release nutrients slowly, reducing fertilizer burn risk
• Introduce beneficial microorganisms that support root resilience
• Buffer pH levels more gently than many synthetic inputs
In small balcony pots, drainage and moisture balance are constant challenges. Castings help soil hold moisture evenly while still draining excess water—especially important during hot afternoons when balcony surfaces amplify heat.
Faster Nutrient Cycling in Limited Volume
In garden beds, organic matter breaks down gradually over months. In a compact vermicomposting container, red worms accelerate decomposition. Their digestive process converts food scraps into plant-ready nutrients much faster than traditional composting.
For remote workers who cook at home more frequently, this creates a natural loop. Vegetable peels from lunch become fertilizer for balcony herbs within weeks. This closed-cycle approach fits modern sustainability goals without demanding large outdoor spaces.
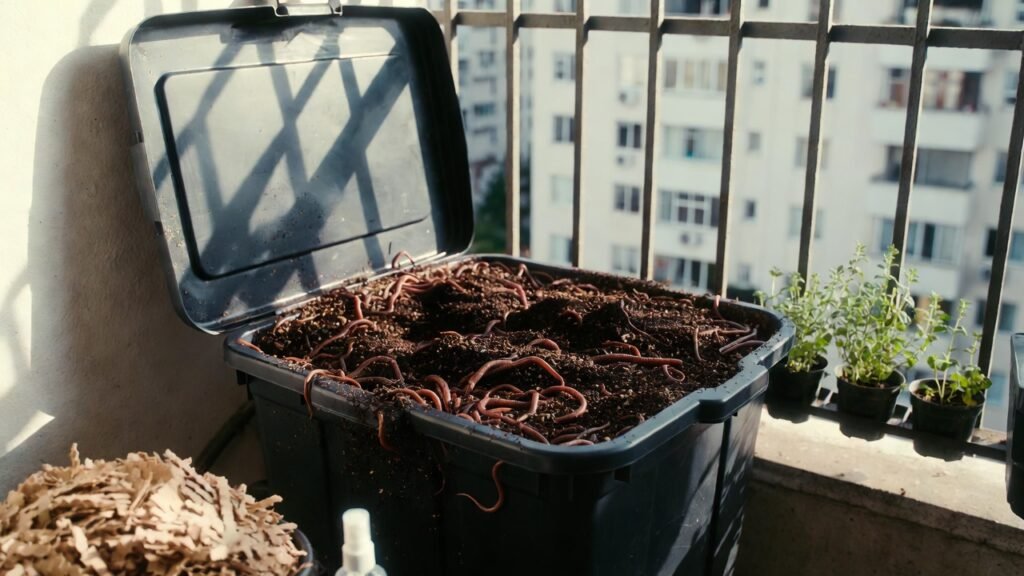
[IMAGE: Compact worm bin on a balcony with soil and red worms visible]
A small bin tucked near a balcony wall or under a shaded shelf can operate quietly year-round in mild climates. With consistent feeding and moisture control, castings can be harvested every 2–3 months, depending on bin size and worm population.
Mini Worm Bin Setups for Balconies
Balcony worm farming succeeds when the setup matches the space. Compact, odor-controlled systems work best in urban environments where airflow and neighbors matter.
Before choosing a system, consider three factors:
• Balcony size and layout
• Sun exposure and temperature range
• Household food scrap volume
A shaded balcony corner is ideal. Worms prefer temperatures between 55–77°F (13–25°C). Direct summer sun can overheat bins, so positioning matters.
Choosing the Right Vermicomposting Container
A vermicomposting container for balcony use should prioritize airflow, drainage, and pest control. Several practical options work well:
Stackable tray systems
These allow worms to migrate upward as lower trays fill with castings. They are compact and easy to harvest.
DIY storage bin systems
Food-grade plastic bins with drilled air holes can function effectively. A simple two-bin design allows drainage collection underneath.
Wooden worm boxes
Breathable and visually appealing, though they may require additional lining to prevent moisture loss.
Regardless of style, the bin should include:
• Air ventilation holes
• Drainage holes or a leachate collection tray
• A tight-fitting lid to prevent fruit flies
• Bedding depth of at least 3–4 inches
Balcony gardeners often prefer stackable systems because they minimize disturbance during harvesting.
Step-by-Step: Setting Up Your Balcony Worm Farm
Setting up a balcony worm farm is straightforward when done methodically. Taking time at the beginning reduces odor, pests, and maintenance issues later.
Step 1: Choose the Right Worm Species
Not all worms are suited for vermicomposting. Garden earthworms do not thrive in bins.
The most effective species are:
• Red wigglers (Eisenia fetida)
• European nightcrawlers (Eisenia hortensis)
Red wigglers are typically preferred for balcony setups because they reproduce quickly and tolerate confined environments. A starting population of 0.5 to 1 pound of worms is sufficient for most small households.
Step 2: Prepare the Bedding Properly
Bedding creates the base habitat for worms and regulates moisture.
Use a mix of:
• Shredded newspaper or cardboard (non-glossy)
• Coconut coir (rehydrated)
• A handful of finished compost or garden soil
Moisten bedding until it feels like a wrung-out sponge. It should be damp but not dripping. Overly wet bedding is one of the most common mistakes in small balcony systems.
Fluff bedding to create air pockets. Worms need oxygen as much as moisture.
Step 3: Introduce Worms Gently
Place worms on top of the bedding and leave the lid off under soft light for a few minutes. Worms instinctively burrow away from light, helping them settle into their new environment.
Avoid feeding immediately. Allow them 24–48 hours to acclimate.
Step 4: Establish a Feeding Routine
Consistency matters more than volume. In small balcony systems, overfeeding causes odor.
Feed:
• Vegetable peels
• Coffee grounds (in moderation)
• Crushed eggshells
• Fruit scraps (bury well to avoid flies)
Avoid:
• Meat or dairy
• Oily foods
• Large amounts of citrus
• Salty or processed foods
Bury scraps beneath bedding to reduce odor and pests. A simple rule that works well for balcony gardeners is feeding once or twice weekly in small quantities, adjusting based on how quickly food disappears.
In remote work routines, tying feeding to weekly kitchen clean-outs helps maintain consistency without overthinking the process.
Managing Moisture and Airflow
Balconies experience temperature swings. Monitoring moisture weekly prevents common issues.
Signs bedding is too wet:
• Strong odor
• Visible pooling liquid
• Worms clustering near the lid
Signs bedding is too dry:
• Worms thin and sluggish
• Bedding crumbly and dusty
Light misting can restore balance. During hot months, adding extra cardboard improves airflow.
How Balcony Soil Enrichment Happens Over Time
Worm castings accumulate gradually at the bottom of the bin. In 8–12 weeks, the lower layer becomes dark, fine, and soil-like.
For container gardening, castings can be used in several ways:
• Mix 10–20% into fresh potting soil
• Top-dress herbs and vegetables
• Brew simple worm tea for liquid feeding
The impact is often visible within weeks. Leaves appear deeper green, flowering improves, and soil texture becomes more resilient against overwatering.
Because balcony pots hold limited soil volume, even small amounts of castings can noticeably improve plant performance.
Balcony worm farming fits modern sustainable living. It reduces household waste, strengthens plant health naturally, and operates quietly in small spaces. With a compact system and steady routine, vermicomposting becomes a practical tool for faster, healthier balcony soil enrichment.
Odor Management and Troubleshooting Tips
A properly managed balcony worm farm should smell earthy, not sour. In small urban spaces, odor control is essential—not just for comfort, but for neighbor-friendly gardening. Most odor issues come from imbalance rather than the worms themselves.
When food scraps decompose anaerobically (without airflow), they create unpleasant smells. The good news is that this is usually easy to correct with small adjustments.
Preventing Odor Before It Starts
Prevention is simpler than fixing an active issue. Consistent routines make a noticeable difference.
• Chop food scraps into smaller pieces for faster breakdown
• Bury food beneath bedding instead of leaving it exposed
• Add dry cardboard if the bin feels overly damp
• Avoid overfeeding, especially during cooler months
• Keep the bin shaded from direct sun
Balcony bins tend to heat up quickly in summer. High temperatures can accelerate decomposition too fast, leading to sour smells. In warm climates, feeding smaller amounts more frequently helps maintain balance.
Troubleshooting Common Balcony Worm Farm Problems
Even experienced gardeners occasionally run into issues. Addressing them early keeps your vermicomposting container healthy and efficient.
If the bin smells like ammonia
This often signals excess nitrogen from too many fresh scraps. Add shredded cardboard and pause feeding for a few days.
If fruit flies appear
Bury scraps deeper and cover the top layer with damp newspaper. Freezing scraps before feeding can also reduce larvae risk.
If worms are trying to escape
Check moisture, temperature, and airflow. Overheating or waterlogged bedding are common causes.
If decomposition seems slow
Ensure worms are active and the temperature remains within their preferred range. In colder months, balcony bins may require insulation or relocation indoors.
Small-space systems respond quickly to changes, so adjustments usually show results within a week.
How to Harvest Worm Castings for Maximum Soil Benefit
Harvesting castings is one of the most rewarding parts of balcony worm farming. The fine, dark material at the bottom of the bin represents concentrated balcony soil enrichment that supports root health and microbial activity.
Timing matters. Castings are ready when most original bedding is no longer recognizable and the texture resembles loose coffee grounds.
Simple Harvesting Methods for Balcony Bins
Different bin types require slightly different approaches, but these methods work well in compact systems.
Migration Method
Move finished compost to one side of the bin. Add fresh bedding and food to the empty side. Over 1–2 weeks, worms migrate, allowing you to collect castings from the finished section.
Tray System Method
In stackable bins, worms naturally move upward toward fresh food. Once the lower tray is mostly castings, remove and harvest.
Light Separation Method
Dump contents onto a tarp in indirect light. Worms burrow downward, allowing gradual removal of castings from the top.
For balcony gardeners, migration and tray systems tend to be cleaner and more convenient.
Using Castings in Container Gardens
Worm castings are gentle and rarely cause nutrient burn, making them ideal for balcony pots.
Ways to apply:
• Mix 10–20% castings into new potting soil
• Top-dress established plants every 4–6 weeks
• Blend into seed-starting mixes
• Create a mild liquid extract for periodic feeding
Because containers hold limited soil, small additions go a long way. Consistent, light applications often produce better results than large single doses.
Combining Worm Farming with Potted Plants and Composting
Balcony gardening works best when systems support each other. Worm farming integrates naturally with container planting and small-scale composting habits.
Remote work routines often generate regular kitchen scraps—coffee grounds in the morning, vegetable peels at lunch, herb trimmings at dinner. Instead of discarding these materials, they can feed your balcony worm farm, which in turn feeds your plants.
Creating a Sustainable Balcony Loop
A simple loop might look like this:
Kitchen scraps → Worm bin → Castings → Potted plants → Harvested herbs → Kitchen
This circular flow reduces household waste and decreases reliance on store-bought fertilizers.
For gardeners who already practice composting, worms can accelerate the process. Small amounts of pre-composted material can be added to the bin once partially broken down.
However, avoid combining large outdoor compost piles directly with balcony systems. Controlled feeding keeps the worm environment stable.
Seasonal Adjustments for Balcony Systems
Balconies experience stronger temperature swings than indoor spaces.
In summer:
• Increase airflow
• Reduce feeding during extreme heat
• Provide shade or insulation
In winter:
• Reduce feeding frequency
• Protect the bin from frost
• Move indoors if temperatures drop below worm tolerance
With seasonal awareness, a worm farm can remain productive year-round in many climates.
Long-Term Maintenance for a Healthy Worm Population
Over time, worm populations naturally regulate based on available food and space. In a well-balanced system, reproduction matches capacity.
To maintain a healthy population:
• Avoid chemical contamination from treated wood or synthetic sprays
• Maintain consistent moisture
• Rotate feeding zones
• Refresh bedding every few months
Balcony worm farming thrives on moderation. Over-managing often causes more issues than a steady, light-touch approach.
With a stable setup, castings production becomes predictable, supporting container plants throughout their growing cycles.
Conclusion
Balcony worm farming offers a practical way to strengthen soil health in small urban gardens. A compact vermicomposting container transforms everyday kitchen scraps into nutrient-rich castings that improve soil structure, support microbial life, and enhance plant resilience.
For those cultivating herbs, vegetables, or ornamentals in pots, consistent balcony soil enrichment can make the difference between average growth and vibrant productivity. With thoughtful setup, balanced feeding, and seasonal awareness, a balcony worm farm becomes a quiet, efficient partner in sustainable gardening.
As more households embrace eco-conscious living and home-based routines, vermicomposting stands out as a realistic, manageable step toward reducing waste and nurturing healthier plants—right outside your door.
FAQ Section
1. Is balcony worm farming safe for apartment living?
Yes, when properly maintained, a balcony worm farm is odor-free and contained. The key is balanced feeding, adequate airflow, and moisture control. Avoid overfeeding and always bury scraps. With a sealed lid and proper drainage, the system remains clean and neighbor-friendly.
2. How long does it take to produce usable worm castings?
Most small systems begin producing harvestable castings within 8 to 12 weeks. The timeline depends on temperature, worm population, and feeding consistency. Warmer conditions and finely chopped scraps tend to speed up decomposition.
3. Can worm bins survive extreme summer heat on balconies?
Worms prefer moderate temperatures. During extreme heat, shade the bin, reduce feeding, and improve airflow. If temperatures regularly exceed safe ranges, temporarily relocating the bin indoors may help protect the population.
4. What plants benefit most from worm castings?
Herbs, leafy greens, tomatoes, peppers, and flowering annuals respond especially well. Castings improve moisture balance and nutrient availability, which is particularly valuable in container environments with limited soil volume.
5. Do worm bins attract pests?
When properly managed, they do not. Fruit flies typically appear only when food is left exposed. Bury scraps deeply and keep the top layer covered with bedding to prevent issues.
6. How much maintenance does a balcony worm farm require?
Maintenance is minimal—usually 10–15 minutes per week. This includes feeding, checking moisture levels, and adjusting bedding if necessary. Harvesting occurs every few months depending on bin size and productivity.
Helpful Resources
- Vermicomposting Research and Guidelines – Utah State University Extension – Offers a practical guide to building and maintaining worm bins, plus tips on bedding and feeding to keep your vermicomposting container healthy.
- Vermicomposting Basics – Oklahoma State University Extension – Covers key principles of vermicomposting, including how worms produce castings and how to manage a worm bin.
- Vermicomposting Best Practices – North Carolina Cooperative Extension – Provides guidance on feeding, moisture control, and avoiding common pitfalls in home worm bin