
Introduction to Water-Saving Tips for Balcony Gardeners
Why Balcony Gardens Need Smarter Watering
Balcony gardens may look effortless and serene, but behind the beauty lies one constant challenge: water management. Containers dry out far faster than the ground because they have limited soil, no natural groundwater access, and are fully exposed to sunlight and wind. This makes balcony gardening uniquely rewarding but also uniquely demanding when it comes to moisture retention and plant care.
Unlike traditional gardens rooted in the earth, balcony plants live in confined pots that heat up quickly under the sun. Wind—especially on higher floors—wicks moisture from soil and leaves. Even rain offers little relief because overhangs and railings block it from reaching your pots. The result? Your plants depend entirely on you for survival.
And when plants begin to wilt, most beginners react the only way they know how—by watering heavily and often. But this leads to a different problem:
- Water runs straight through the pot.
- Nutrients leach away with every excess watering.
- The soil becomes compacted, and roots suffocate.
This cycle of dry soil → panic watering → runoff and stress is what we call “balcony water stress.”
The Good News: You Can Fix This—Efficiently and Sustainably
With the right water-saving tips for balcony gardening, you can grow thriving plants without constantly worrying about wilted leaves or wasted water. Smart watering isn’t about using more—it’s about using less water, more wisely.
By adopting sustainable watering practices, you’ll:
✔ Save money on water bills in the long run.
✔ Reduce daily maintenance—no more morning-to-night watering.
✔ Keep plants consistently hydrated and healthier.
✔ Avoid runoff and soil erosion.
✔ Garden in a way that’s kinder to the environment.
What This Guide Will Teach You
In this post, you’ll learn actionable, real-world strategies such as:
- How to set up drip irrigation systems for containers.
- The simplest DIY self-watering setups using bottles or wicks.
- Why mulching is a secret weapon for moisture retention.
- How capillary mats and plant grouping keep soil moist longer.
- Smart tech tools like timers and moisture sensors that water your plants only when needed.
By the end of this guide, you won’t just be watering your plants—you’ll be watering them smarter, not harder. Your balcony garden will stay green, happy, and resilient, even in the blazing heat of midsummer or during busy weeks when you don’t have time for daily watering.
Related: Eco-Friendly Container Gardening: Sustainable Choices for Balcony Growers
Understand Your Balcony’s Water Needs
Before investing in drip irrigation, self-watering pots, or moisture sensors, the first step to smart watering is simple: know your balcony. Every balcony behaves differently depending on its direction, height, materials, and the type of plants you grow. Understanding these conditions helps you avoid overwatering, underwatering, or wasting water altogether.
1. Sunlight Exposure Determines Moisture Loss
The amount of sun your balcony receives has a direct impact on how fast your soil dries.
| Balcony Direction | Sun Exposure | Watering Need |
| South-facing | Full sun most of the day | Dries very fast — water daily in summer |
| West-facing | Strong afternoon sun | Moderate to high watering need |
| East-facing | Gentle morning light | Moderate watering, ideal for leafy greens |
| North-facing | Gentle morning light | Soil stays moist longer — risk of overwatering |
Plants like tomatoes, peppers, and basil in full sun require more frequent watering, while spinach, lettuce, ferns, or mint in shaded balconies retain moisture longer.
2. Wind Exposure Accelerates Evaporation
The higher the floor, the stronger the wind. Wind strips moisture from both soil and leaves, causing your plants to dry out twice as fast.
Signs your plants are suffering from wind-induced water loss:
- Soil feels dry just hours after watering.
- Leaf edges look crispy or curled.
- Lightweight containers tip over easily.
If your balcony is windy, consider:
✔ Grouping plants together to create a protective microclimate.
✔ Using heavier ceramic or terracotta containers.
✔ Installing bamboo screens or clear plastic windbreaks.
3. Container Size and Material Matter
Not all pots retain moisture the same way:
| Container Type | Water Retention | Notes |
| Small Pots | Low | Dry out quickly — water daily in hot weather |
| Large Containers | High | Hold moisture longer — ideal for tomatoes, peppers |
| Terracotta | Breathable but dries fast | Great for herbs, but needs regular watering |
| Plastic/Resin | Retains water | Good for water-saving balcony gardening |
| Fabric Grow Bags | Excellent drainage but loses moisture quickly | Pair with mulch or drip irrigation |
Larger containers not only retain more water but also allow roots to grow deeper, making plants more resilient to heat and drought.
4. Different Plants = Different Thirst Levels
Understanding how much water your balcony plants need helps you avoid both wilted leaves and root rot.
| Plant Type | Water Need | Examples |
| High-Thirst Plants | Daily watering in summer | Basil, lettuce, tomatoes, cucumbers |
| Moderate Drinkers | Every 1–2 days | Peppers, spinach, beans |
| Low-Water Plants | Every 1–2 days | Rosemary, thyme, succulents, aloe vera |
Pro Tip:
Group plants by their water needs. Don’t place succulents next to water-hungry basil — they’ll either rot or starve.
5. How to Monitor Soil Moisture (Beginner-Friendly Method)
You don’t need complicated tools to understand when your balcony plants need a drink.
Method 1: Finger Test (Simple & Reliable)
- Push your finger 2 inches into the soil.
- If it feels dry at that depth, it’s time to water.
- If it’s cool or slightly damp, wait another day.
Method 2: Soil Moisture Meter (More Accurate)
For those who travel or forget to water regularly, a soil moisture meter takes away the guesswork. Insert the probe into the pot — if it reads “dry,” water.
Why This Step Matters Before Installing Any Watering System
Understanding your balcony’s natural water usage helps you:
- Choose the right watering method (manual, drip, or self-watering pots)
- Avoid overwatering, a common mistake in container gardening
- Create a tailored watering schedule instead of guessing
- Save water, time, and stressed-out plants
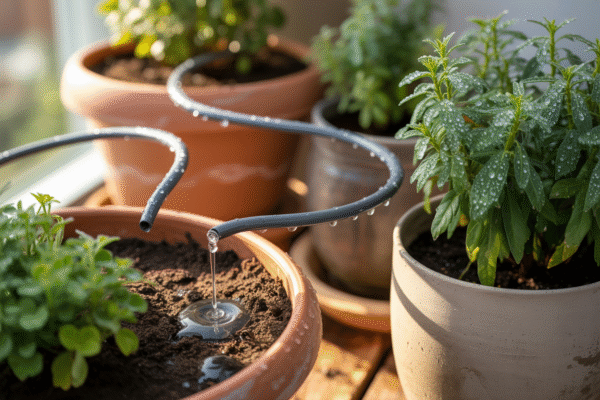
Drip Irrigation for Containers
When it comes to efficient watering, drip irrigation is the gold standard for balcony gardens. Unlike traditional watering cans or sprinklers that soak leaves and waste water through runoff and evaporation, a drip system delivers water directly to the plant’s root zone—slowly, steadily, and with precision. This makes it ideal for balconies where water conservation, limited space, and plant health are top priorities.
Why Drip Irrigation Works Perfectly for Balcony Containers
A well-installed drip irrigation system offers multiple advantages over manual watering:
| Benefit | Why It Matters for Balcony Gardeners |
| Less Water Waste | Water drips directly into the soil rather than evaporating or spilling over the edges of pots. |
| Healthier Plants | Leaves stay dry, preventing fungal diseases like powdery mildew or blight. |
| Consistent Moisture | Roots receive a steady flow of water—no more wilted leaves in the afternoon or soggy soil in the evening. |
| Time-Saving | You don’t need to water daily—just set your timer and let the system handle it. |
| Ideal for Busy or Traveling Gardeners | Drip irrigation ensures plants stay hydrated even when you’re not around. |
This is why many experts recommend drip irrigation for balcony containers, especially for thirsty plants like tomatoes, peppers, cucumbers, and herbs.
How to Install a Drip Irrigation System on Your Balcony (Step-by-Step)
You don’t need a backyard faucet or professional tools. A small kit and 30 minutes is all it takes.
- Choose the Right Drip Kit
Pick a drip irrigation kit specifically made for container gardening.
✅ Example: Raindrip Automatic Container Drip Irrigation Kit - Connect to a Water Source
You can connect the system in two ways:
- Directly to your balcony faucet or outdoor tap
- Or to a water reservoir/bucket using a gravity-fed drip system
- Lay the Tubing
Run the main water tubing along the base or railing of your balcony. Use clips or zip ties to keep it in place neatly. - Place Drip Emitters in Each Pot
- Insert a small dripper or microtube into each container.
- Position it 2–3 cm away from the base of the plant, right above the root zone.
- For large pots (like tomatoes), use two emitters.
- Add a Timer (Optional but Highly Recommended)
A battery-powered or smart hose timer automates watering at ideal times — usually early morning.
This prevents water loss and reduces plant stress.
Example Watering Schedule:
| Plant Type | Summer | Spring/Autumn |
| Tomatoes | 10–15 minutes daily | Every 2 days |
| Herbs (basil, parsley) | 8–10 min daily | Every 2–3 days |
| Succulents | Once a week | Every 10–14 days |
Pro Tips for Success with Drip Irrigation
- Use mulch on top of the soil — it boosts drip efficiency by reducing evaporation.
- Test the system one week before traveling to check for leaks or clogs.
- Clean emitters regularly, especially if using tap water with minerals.
- In winter, remove and store the system indoors to prevent cracking.
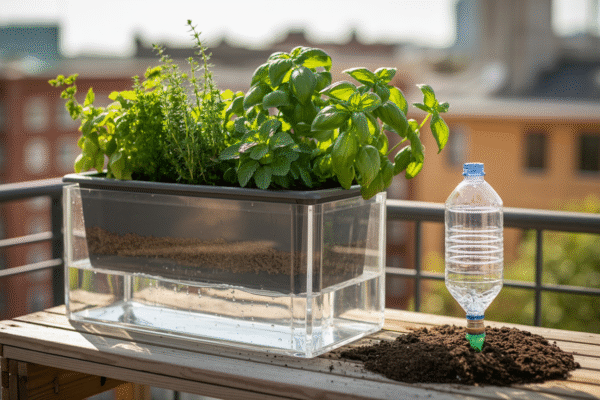
Self-Watering Planters & DIY Bottle Systems
Not every balcony gardener wants to deal with hoses, tubing, or timers. That’s where self-watering planters come in — one of the easiest and most reliable water-saving methods for container gardening. These planters are designed with a hidden water reservoir at the base. The plant’s roots absorb moisture gradually through capillary action, meaning your soil stays consistently damp without daily watering.
Why Self-Watering Containers Are Perfect for Balcony Gardens
Balcony gardens often face intense sunlight, wind, and limited soil depth — all of which can cause containers to dry out within hours. A self-watering planter solves this by storing water and feeding it slowly to the root zone. That means:
- The topsoil stays dry, reducing weed growth and fungal diseases.
- Roots grow deeper and stronger because they search for water below the surface.
- You only need to refill the reservoir once every few days or once a week, depending on the weather.
This makes them ideal for busy people, frequent travelers, or anyone who forgets to water.
Self-watering planters work especially well for:
- Herbs like basil, thyme, and mint
- Leafy greens such as lettuce, spinach, and arugula
- Flowers like petunias, geraniums, and marigolds
DIY Watering System Using Plastic Bottles (Budget-Friendly & Sustainable)
If you don’t want to buy a self-watering planter, you can make your own system with something you probably already have at home — a plastic bottle. This is one of the most practical zero-waste watering hacks for balcony gardening.
Here’s how to make it:
- Take a clean plastic bottle (500ml to 2L depending on pot size).
- Fill it with water.
- Poke a few small holes in the bottle cap using a heated needle or thumbtack.
- Turn the bottle upside down and bury the neck into the soil, close to the plant’s roots.
Once installed, water slowly trickles from the bottle into the soil over several days. This prevents shock from sudden watering, keeps soil evenly moist, and saves water from evaporating on the surface.
You can use this method for vegetables like tomatoes, peppers, or cucumbers — just make sure the bottle is securely positioned so it doesn’t tip over on windy balconies.
Why This Method Works So Well
- No daily watering required — perfect for travel or busy mornings.
- Prevents underwatering and overwatering because moisture is delivered slowly.
- Supports eco-friendly gardening by reusing plastic rather than throwing it away.
- Affordable and customizable — works for any pot size or plant type.
How to Keep Your Balcony Plants Healthy When You’re Busy or Traveling
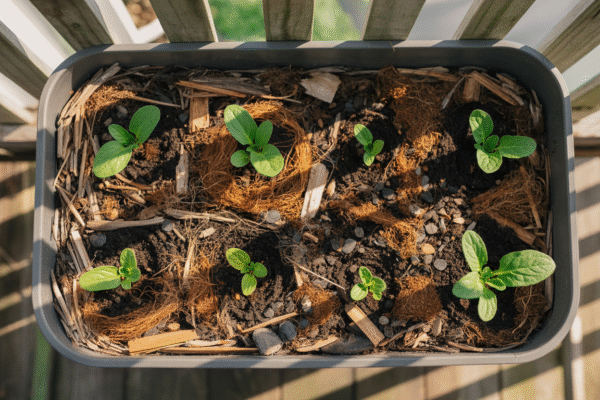
Mulching: Keep Moisture in the Soil
If you want to save water and grow healthier plants on your balcony, mulching is one of the simplest and most effective techniques you can use. It’s an old gardening method, but in container gardening—where soil dries out much faster than garden beds—it becomes essential. A layer of mulch placed over the soil acts like insulation, trapping moisture, shielding roots from heat, and drastically reducing how often you need to water.
Why Mulching is a Must for Balcony Gardening
Unlike ground gardens, container soil is exposed on all sides to heat, sunlight, and wind. This dries out pots quickly, especially during summer. Mulch creates a protective barrier between the soil and open air, keeping moisture locked in.
When done correctly, mulching can:
- Reduce water loss by up to 60–70%
- Keep soil temperatures stable, preventing roots from overheating
- Stop topsoil from cracking and hardening under the sun
- Reduce how often you need to water—saving you time and effort
- Improve soil health slowly over time when organic mulch materials decompose
This is why mulching is one of the best water-saving tips for balcony gardening—especially for busy gardeners or those living in hot, dry climates.
Best Mulch Materials for Container and Balcony Plants
You don’t need anything fancy—many materials can work, depending on your style and budget. Here are the most effective kinds:
Coconut Husk Mulch (Coir Chips)
Lightweight yet excellent at retaining moisture. They’re eco-friendly, breathable, and look natural on top of pots.
Bark or Wood Chips
Ideal for decorative planters and larger pots. They stay in place even on windy balconies and break down slowly.
Shredded Dry Leaves
One of the most sustainable and free mulch options. Shred fallen leaves and spread them across the top of your soil. They break down easily and enrich the soil.
Straw or Hay
Perfect for vegetable containers like tomatoes or peppers. It’s light, breathable, and keeps the soil cooler.
Decorative Pebbles or Gravel
While not organic, they are excellent for very windy balconies. Pebbles reduce evaporation and keep soil in place during storms.
How to Apply Mulch the Right Way
To make the most of mulching for balcony plants:
- Water your pots deeply first — mulch retains moisture; it doesn’t create it.
- Add a layer of mulch about 2–3 inches thick over the surface.
- Keep a small gap around the plant stem to prevent rot or fungal growth.
- Check moisture under the mulch occasionally—don’t water blindly.
- Replace or top-up organic mulch every few months, especially after heavy rain or strong winds.
Tip: If your balcony is frequently windy, use heavier mulch like bark, pebbles, or coconut husk chips so it stays in place.
Why Mulching Makes Sense for Water-Saving Gardeners
Mulching is more than just a cosmetic touch—it’s a core part of sustainable balcony gardening. It saves water, reduces plant stress, and creates a cooler, healthier growing environment. Combine mulching with drip irrigation or self-watering pots, and you’ll notice your plants stay greener, your soil stays moist longer, and you spend less time watering every day.
Capillary Mats for Small Spaces
Capillary mats are one of the most overlooked yet powerful tools for water-saving balcony gardening. They work on a simple principle — instead of watering from the top, plants draw water upward from below using natural capillary action. This keeps the soil consistently moist without drowning the roots or drying out completely.
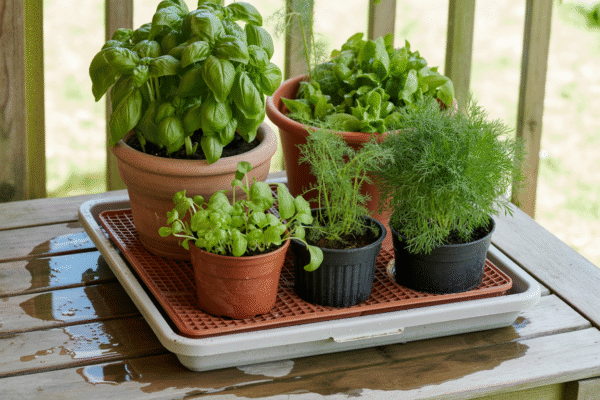
How Capillary Mats Work
A capillary mat is made from highly absorbent fabric or felt-like material. It sits on top of a tray or waterproof surface, and part of the mat stays wet by absorbing water from a container or reservoir. When you place pots on top of the mat (as long as they have drainage holes), the soil inside the pots gradually pulls water up through the holes whenever it begins to dry out.
It’s like giving your plants access to a constant, gentle drink — instead of flooding them with water once or twice a day.
Why Capillary Mats Are Perfect for Balcony Gardeners
Capillary mats offer several advantages that make them ideal for small-space or city growers:
- Perfect for people who travel or have busy schedules — once the mat and reservoir are filled, your plants can water themselves for days.
- Prevents underwatering and overwatering — the plants only take up as much moisture as they need.
- Ensures even moisture distribution — no more dry edges and soggy centers in your pots.
- Simple setup — no hoses, timers, or plumbing required.
- Works even indoors or in shaded balconies where drip irrigation might not be practical.
They are especially useful for herbs, leafy greens, seedlings, and flowering plants that don’t like their roots drying out.
How to Set Up a Capillary Mat on Your Balcony
You don’t need any special skills to install one. Here’s how to do it:
- Place a waterproof tray or shallow container on your balcony table or floor.
- Lay the capillary mat on top, making sure it lies flat.
- Dip one side of the mat into a water-filled container or tray so it can soak up and distribute moisture.
- Place pots directly on the mat. Make sure they have drainage holes — otherwise the water can’t wick up.
- Refill the reservoir every few days depending on weather conditions.
Pro Tip: If you expect to be away for up to 10 days, use a deeper tray or storage container as a reservoir beneath the mat. This allows continuous water absorption without refilling.
Best Plants for Capillary Watering Systems
Capillary mats work best with:
- Herbs (basil, parsley, mint)
- Leafy greens (spinach, lettuce, arugula)
- Strawberries and small fruit plants
- Flowering balcony plants like petunias or pansies
Avoid using them for succulents or cacti, which prefer dry soil and can rot if constantly moist.
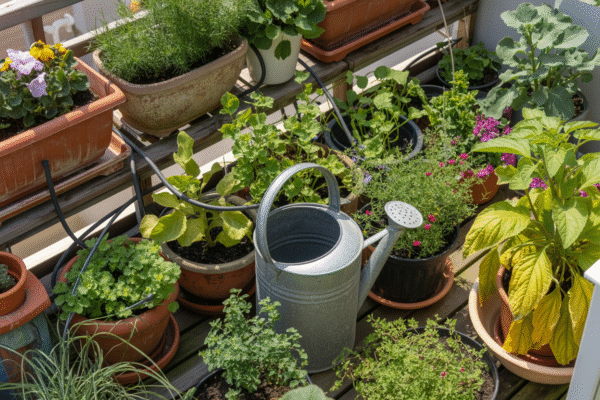
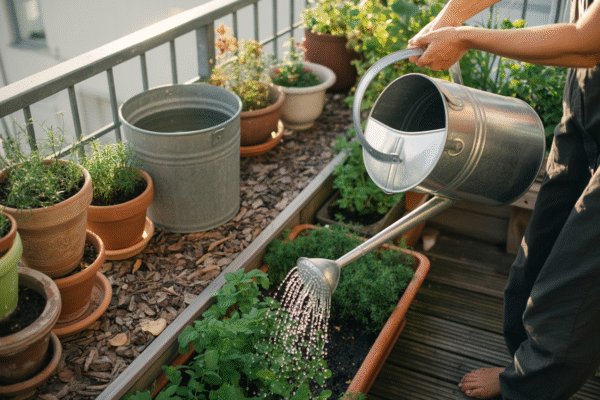
Grouping & Shading Plants
Water-saving gardening isn’t just about irrigation systems — sometimes, the smartest solutions are about how you arrange your plants. By grouping pots together and managing sunlight exposure, you can significantly reduce water loss and create a more self-sustaining mini-ecosystem right on your balcony.
Why Plant Grouping Works
When plants are scattered individually across a balcony, each pot is exposed to direct sunlight, wind, and dry air. But when you group containers close together, something powerful happens — they begin to create a microclimate.
In this microclimate:
- Humidity builds around the leaves and soil, slowing down evaporation.
- Soil stays moist for longer periods.
- Plants act as natural windbreaks for one another.
- Watering becomes easier — you can hydrate several pots at once instead of walking around with a watering can.
Best plants to group together:
- High-thirst plants: basil, tomatoes, parsley, peppers, cucumbers
- Moderate drinkers: lettuce, beans, kale
- Low-water plants (keep separate): succulents, rosemary, thyme, lavender
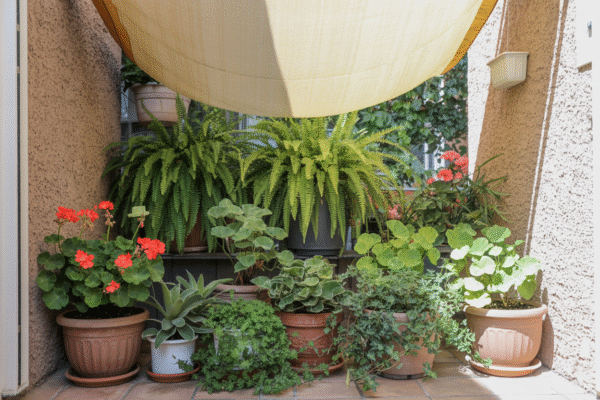
Shade = Less Heat, Less Evaporation
Sunlight is essential for growth — but too much of it can stress your balcony plants and dry out containers quickly. This is especially true for south- or west-facing balconies that receive intense afternoon sun.
Adding shade strategically helps:
- Reduce soil evaporation by up to 50%
- Prevent leaf burn and heat stress
- Keep roots cool — especially in metal or dark-colored pots
- Cut down watering frequency during heatwaves
Simple ways to shade balcony plants:
- Hang a shade cloth during the hottest part of the day.
- Use a bamboo screen, umbrella, or old bedsheet as a temporary sun barrier.
- Place taller plants (tomatoes, sunflowers) to shade smaller, delicate plants like lettuce or spinach.
- Place reflective materials (like light-colored walls or mirrors) to bounce indirect light without overheating plants.
How to Organize Your Balcony for Smart Water Use
- Place the thirstiest plants closest to your watering point or drip system.
- Group herbs and leafy greens together in one section.
- Keep drought-tolerant plants (like succulents) away from water-loving ones so you don’t accidentally overwater them.
- Cluster pots tightly in the hottest months — this traps moisture and reduces wind exposure.
- Add shade cloth or lightweight fabric above plants during strong afternoon sun.
Real Example
A balcony in full afternoon sun with basil, tomatoes, and lettuce spaced apart requires watering twice a day in summer. But when the same plants are grouped together, placed near a wall, mulched, and partially shaded, watering is reduced to once every 1–2 days — without stress or wilting.
This simple, no-cost strategy is one of the most effective water-saving tips for balcony gardening — especially in hot or windy climates.
Read this: Balcony Garden Layout Ideas for Small Apartments
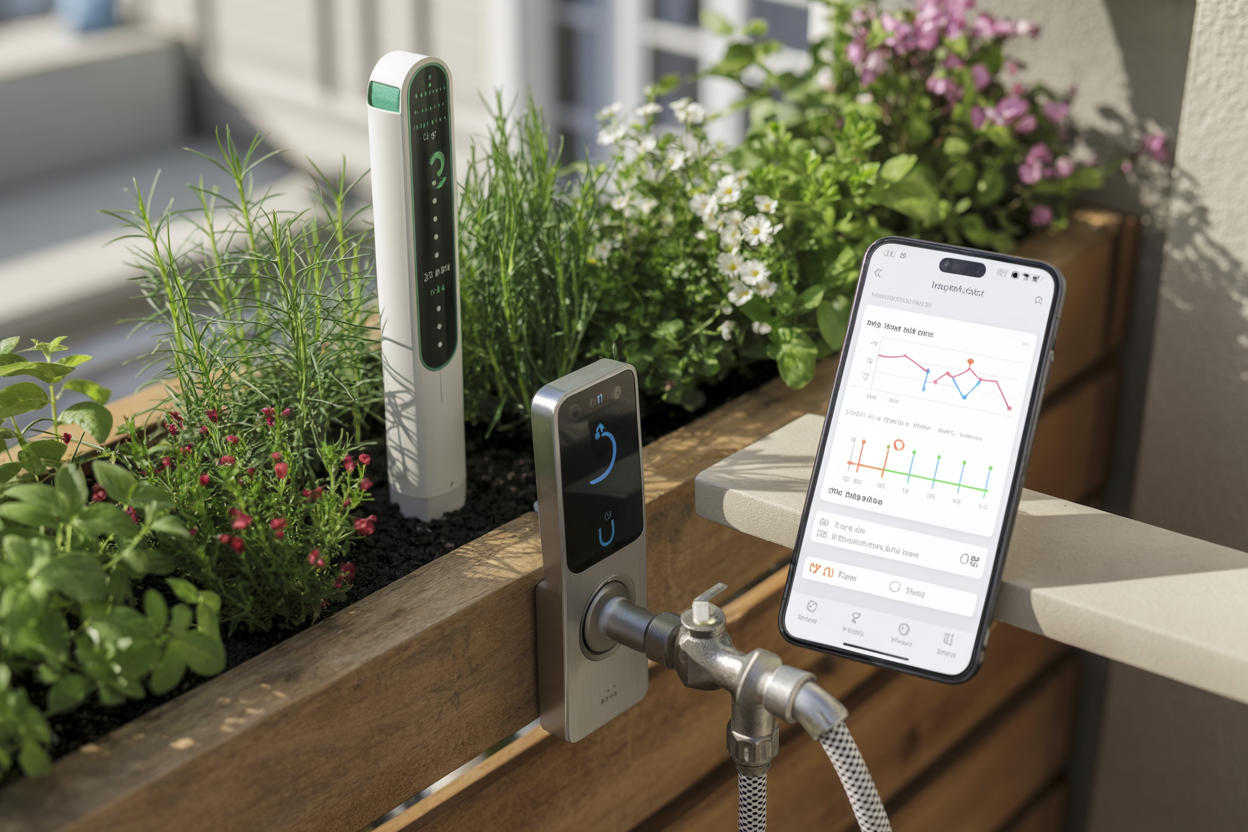
Smart Tech for Watering

Watering balcony plants no longer has to be a daily chore. With modern technology, you can automate watering, track soil moisture levels, and even monitor your garden from anywhere in the world. These smart watering systems are perfect for busy urban gardeners, frequent travelers, and anyone who wants to grow healthier plants with less effort and less wasted water.
Smart tech doesn’t replace your role as a gardener — it supports it, making sure your balcony garden stays hydrated even when you’re asleep, at work, or on vacation.
Soil Moisture Sensors — Know Exactly When to Water
Soil moisture sensors take the guesswork out of watering. Instead of guessing whether your plants are thirsty, a sensor measures moisture levels in real-time and sends alerts to your phone.
Why it’s useful:
- Prevents both overwatering and underwatering
- Helps plants like tomatoes, peppers, or basil stay consistently hydrated
- Essential for beginners who are still learning plant watering needs
- Works well with indoor, shaded, or wind-exposed balconies
Many sensors sync with smartphone apps, showing whether your soil is dry, moist, or waterlogged. Some advanced models even connect directly to smart irrigation systems and trigger automatic watering.
Smart Timers — Automate Your Drip Irrigation
If you’re using a drip irrigation setup, a smart hose timer is one of the best upgrades you can make.
These timers connect to your outdoor tap or water reservoir and allow you to:
- Schedule watering at specific times (e.g., 6 AM every day)
- Adjust watering duration and frequency without touching the system
- Monitor and control watering from a mobile app using Wi-Fi or Bluetooth
- Pause watering during rain or cold weather with built-in weather syncing
Why morning watering matters: Smart timers make it easy to water at dawn, when evaporation is lowest — a key water-saving tip for balcony gardening.
Bluetooth & Wi-Fi Self-Watering Systems
For those who want a completely low-maintenance setup, some self-watering systems now come with Bluetooth or app-based control. These systems combine a reservoir, pump, and timer — allowing you to adjust watering cycles remotely.
Benefits:
- Ideal for long vacations or busy schedules
- Lets you increase or reduce watering instantly from your smartphone
- Great for balconies without tap access — can be connected to a water tank or bottle reservoir
- Helps heavy feeders like tomatoes or cucumbers thrive consistently
Why Smart Watering Makes Sense for Balcony Gardeners
Balcony gardens are more vulnerable to water stress due to shallow soil and direct exposure to sun and wind. Smart watering tools make it easier to conserve water while keeping plants healthy.
You gain:
- Consistency — plants get water when they need it, not when you remember
- Reduced stress — no more fearing wilted plants after a long day
- Water savings — no runoff, no evaporation waste, no overwatering
- Freedom to travel without asking neighbors to water your garden
Pro Tips for Conserving Water
Water early in the morning to reduce evaporation.
Use saucers wisely — but empty excess water to prevent root rot.
Collect greywater (like cooled pasta water) and reuse it for non-edible plants.
Harvest rainwater whenever possible.
Choose drought-tolerant crops like rosemary, thyme, or succulents if your balcony runs dry fast.
Helpful Resources
University of Illinois Extension: Watering Container Gardens
The Spruce: Watering Plants While Away
Royal Horticultural Society (RHS): Balcony Gardening Tips
Frequently Asked Questions (FAQ)
1. How often should I water balcony plants in summer?
Most containers need watering once a day in peak heat, but self-watering systems or mulch can stretch this to 2–3 days.
2. What’s the best water-saving method for beginners?
Start with self-watering pots or DIY bottle systems — they’re affordable, low-maintenance, and effective.
3. Can I use greywater for balcony plants?
Yes, but only for non-edible plants. Avoid soaps with harsh chemicals.
4. Do drip irrigation kits waste water if not used properly?
No — they’re the most efficient method, as long as you adjust emitters for each plant’s needs.
5. Is mulching necessary for balcony plants?
Absolutely. Mulch keeps soil cool, reduces evaporation, and cuts down on watering.
6. Which plants are most water-efficient?
Herbs like rosemary and thyme, succulents, peppers, and kale perform well with minimal water.
7. How can I stop water from dripping onto neighbors’ balconies?
Use saucers, self-watering planters, or capillary mats to capture excess water.