
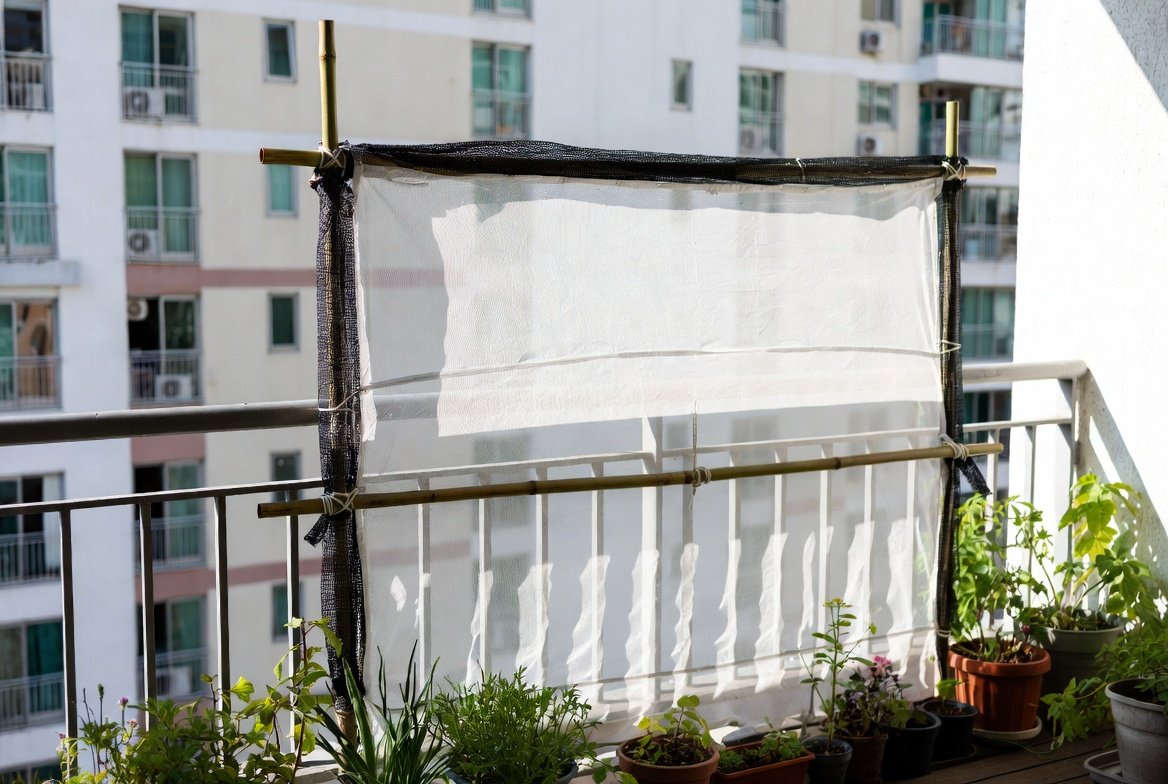
How to Build a DIY Balcony Windbreak for Balcony Privacy and Wind Protection
I’ve learned something the hard way as a balcony gardener: wind is not a background condition—it is a constant force shaping everything you grow.
In my early days, I set up a small balcony garden full of excitement. Seedlings were doing well, pots were arranged neatly, and I thought I had everything under control. Then strong gusts hit. Not gentle airflow, but harsh, irregular wind that turned the space into a tunnel. Soil dried out in hours, lightweight pots toppled, and stems snapped overnight. That was the moment I realized I didn’t just need better plants or watering habits. I needed a proper DIY balcony wind barrier.
What followed was a long period of trial, failure, and adjustment until I finally understood how to build something reliable using cheap materials. This guide is everything I wish I had known from the beginning.
Table of Contents
Understanding Balcony Wind Before Building Anything
Before I build anything now, I always observe how wind behaves on the balcony. This step alone has saved me from many mistakes.
Wind does not move evenly. It shifts direction, increases in certain corners, and sometimes bounces off walls, creating unpredictable turbulence. I usually watch for a few days and pay attention to where plants bend most or where loose items tend to move. That tells me exactly where protection is needed.
I once skipped this step and built a full barrier across my railing. Instead of helping, it trapped pressure and made the entire setup unstable. That experience changed how I approach balcony privacy and wind protection permanently.
If you want a deeper breakdown of airflow patterns, I recommend reading Wind Protection for Balcony Gardens (Most Gardeners Ignore This) because it explains why most balcony setups fail even when they look correct.
Choosing Cheap and Effective Materials for a DIY Windbreak
Over time, I realized that effective wind protection does not require expensive materials. What matters is availability, flexibility, and how well materials are combined.
Bamboo became one of my most reliable options because it is light but strong enough to handle pressure. Shade netting also became a favorite because it reduces wind force without blocking airflow completely.
At one point, I used old curtains as a temporary solution, and surprisingly, they worked better than expected when properly secured. Wooden pallets also became part of my system, especially when I needed structure and durability. I later combined these with recycled plastic sheets and garden mesh depending on the situation.
The biggest lesson here is simple: the best homemade windbreak ideas come from combining materials you already have, not buying perfect ones.
Step-by-Step: How to Build a DIY Balcony Windbreak
Step 1: Observe Wind Direction Before Doing Anything
I always begin by identifying where wind impact is strongest. This usually takes a day or two of observation. I look for patterns—where plants shake the most, where dust collects, and where airflow feels concentrated. That area becomes my priority zone.
Step 2: Choose the Right Cheap Materials
After observation, I select materials based on what is available. Bamboo, shade netting, wooden frames, or even fabric can all work depending on the situation. I no longer chase perfect materials; I focus on practical combinations that suit the balcony conditions.
Step 3: Build a Simple Frame or Support Structure
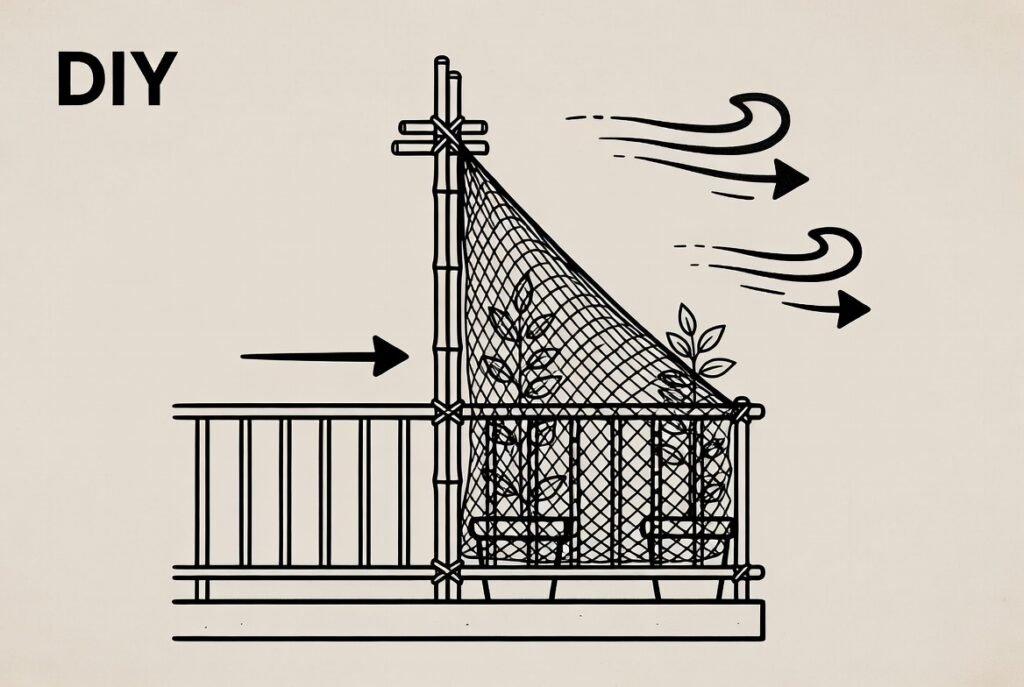
I always create a frame before attaching anything. This could be bamboo poles tied vertically to the railing or wooden supports fixed at key points. This frame gives the windbreak stability and prevents collapse during strong gusts.
Step 4: Attach the Wind-Blocking Material Securely
This is where most failures happen. I attach materials using multiple anchor points—top, middle, and bottom. Loose tying leads to flapping, tearing, and eventual breakdown. A stable structure depends more on secure fastening than on material strength.
Step 5: Test Wind Flow After Installation
After setup, I observe how air moves through the structure. If I notice turbulence building behind the barrier, I adjust spacing or allow small airflow gaps. A good windbreak reduces wind speed, it does not trap air completely.
Step 6: Reinforce Weak Points Immediately
Corners and edges are always the first failure points. I reinforce them with extra ties and stronger knots. I also check the bottom edge because wind often lifts materials from underneath if it is not secured properly.
Step 7: Add Privacy and Comfort Layer (Optional but Recommended)
Sometimes I add a second layer, such as light fabric or mesh behind the main barrier. This improves balcony privacy and wind protection while still allowing airflow. It also makes the space feel more enclosed and peaceful.
Maintenance and Adjustment Over Time
A windbreak is not something you install once and forget. I check mine regularly, especially after storms or seasonal changes.
I tighten loose ties, replace worn materials, and adjust sections when wind patterns shift. One thing I learned over time is that balconies behave differently across seasons, so flexibility is important if you want long-term stability.
Lessons I Learned While Building Balcony Wind Protection
One of my earliest mistakes was trying to block wind completely. I used a solid plastic sheet and ended up creating pressure buildup that made everything worse. That experience taught me that wind should be controlled, not eliminated.
Another lesson came from poor installation. Even strong materials fail if they are loosely tied. Stability depends more on structure and anchoring than on cost.
I also realized that plants actually respond better when airflow is reduced, not removed. Once I got this balance right, my balcony garden became much healthier and easier to manage.
How a Windbreak Improves Privacy and Garden Comfort
Beyond protecting plants, a windbreak changes how the space feels. My balcony became more private, quieter, and more usable once I installed proper barriers.
It reduced exposure from neighboring buildings and created a calm gardening corner. This is why I now see windbreaks as part of both gardening and outdoor living design.
Connecting Wind Protection with the Right Plants
Even the best windbreak works better when paired with suitable plants. Some plants naturally handle stress better than others.
That is why I often combine structural protection with resilient plant choices. A helpful guide like 10 Best Wind-Resistant Plants for Balcony Gardens in Hot and Rainy Climates makes it easier to select plants that can thrive even in exposed conditions.
Final Thoughts
Building a balcony windbreak completely changed my gardening experience. What used to be a constant struggle against wind became something manageable and predictable.
The key is not perfection. Even a simple setup that reduces wind strength can make a huge difference. Start small, observe, adjust, and improve over time.
Your balcony doesn’t need to fight the wind—it just needs to work with it.
FAQs
What is the simplest DIY balcony windbreak to start with?
A shade net or old fabric tied securely to the railing is the easiest starting point.
Can I completely block wind on my balcony?
No, fully blocking wind can create pressure problems. It is better to reduce and control airflow.
What materials last longest for balcony wind protection?
Bamboo and wood last longer with maintenance, while fabric and netting may need occasional replacement.
Will a windbreak reduce sunlight for my plants?
Light mesh materials reduce wind without significantly blocking sunlight.
How do I know if my windbreak is working well?
If plants stop bending excessively, soil retains moisture longer, and objects remain stable, your setup is effective.
Further Readings
For deeper understanding of wind protection, microclimates, and how windbreaks improve plant growth, these research-based and extension resources provide reliable background knowledge:
- University of Minnesota Extension – Windbreaks Overview
This university extension resource explains how windbreaks reduce wind speed, improve microclimates, and protect plants from environmental stress. - University of Nebraska–Lincoln Digital Commons – Windbreaks Research Paper
A scholarly publication discussing the science behind windbreak design and how wind protection improves plant growth and yield.